
Once you have an account in Zoom, it’s pretty easy for anyone to join a Zoom meeting. That’s as easy as clicking on the link that a Host sent to you, either via email or text, etc.
Everything else is on autopilot until, you’re knocking at the door of your host, begging to be let in, like a friendly mosquito on the wrong side of the net going – Where my blood at!
The tricky part, or question for most people would be, how do I become one of those people who host meetings? I’ve got a meeting too, I really do.
In this example, I’m going to be illustrating that using a Linux Mint machine, but the concept is the same across other Operating Systems. The main prerequisites to becoming a Zoom host are;
- A Zoom Account, and
- Your presence, at the time of the meeting. Yes, you have to be present.
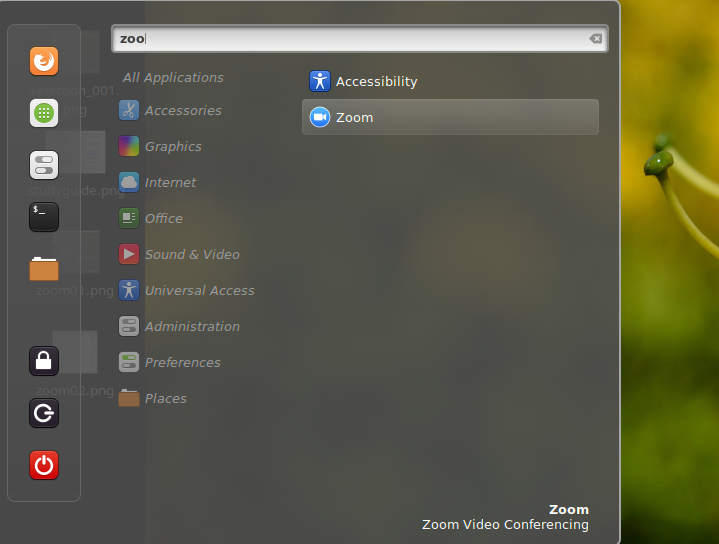
The first thing you’ll want to check, is that you have the Zoom app installed on your computer. I’ll be showing you how this is done via the application itself.
Because trying to host a meeting in Linux takes you to a link, to launch the Zoom app anyway (which is the one you should have installed locally on your computer), so you might as well make sure you have it. If you don’t have the app, go ahead and install it using the guide below….
If you have Zoom already installed, it should come up as you search for it from the Menu icon in the bottom right corner. The screen below will be displayed.
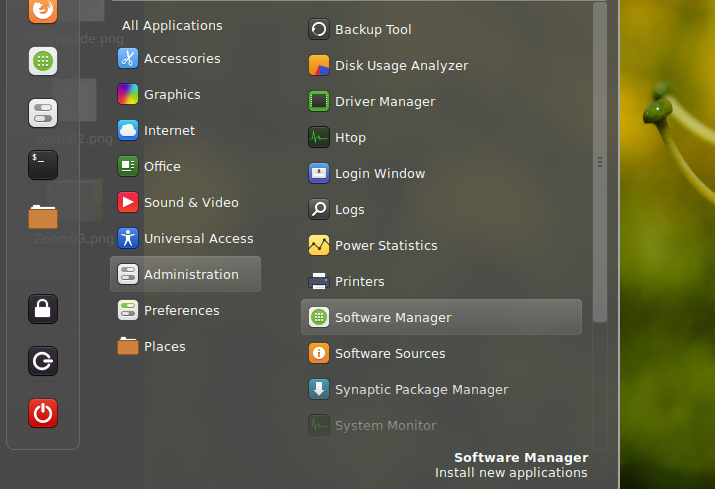
If you don’t have Zoom, just go back to Administration >> Software Manager as shown below
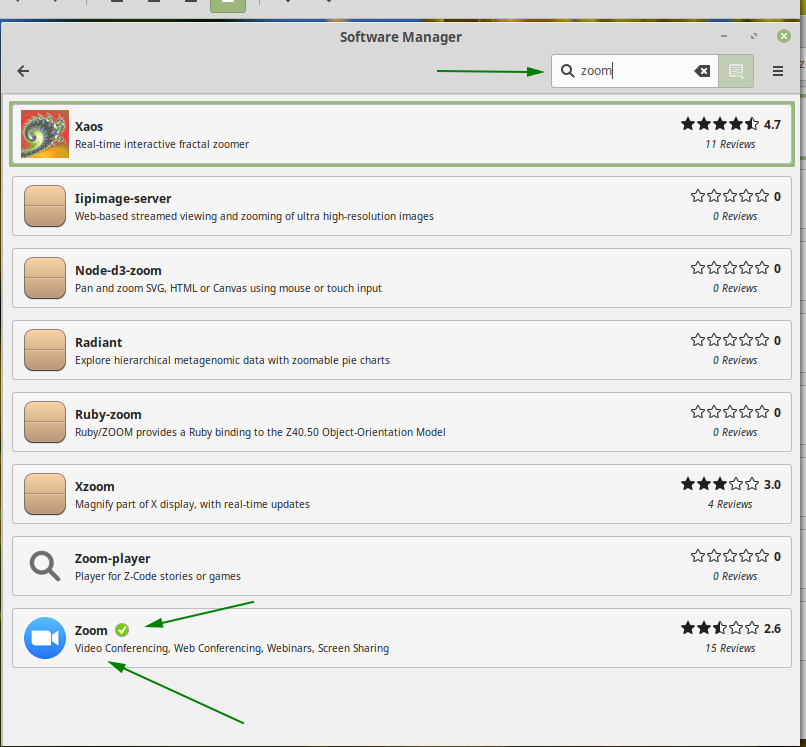
As you can see from the check mark circled in the screenshot above, I have Zoom installed. If you don’t, you’re a click away, so click it to install, once installed, we’re all on the same page.
Next you want to launch Zoom so that you can see where to configure meeting time, how to send invites to recipients, and how to see and allow recipients to join your meeting.
Schedule a Meeting in Zoom
Once you have Zoom launched, sign in with your credentials and it will take you to the screen that looks like below.
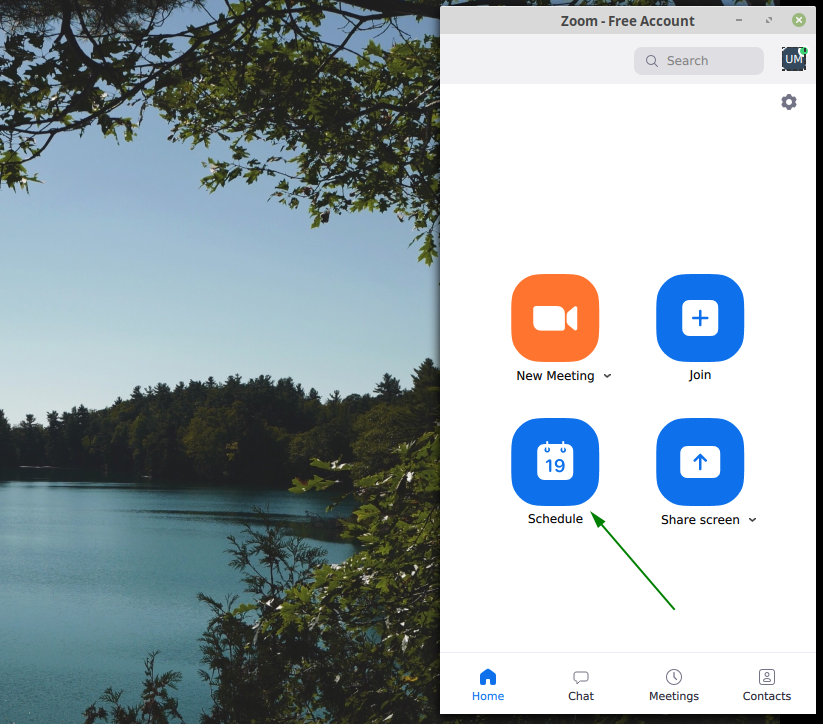
Then select >> Schedule…
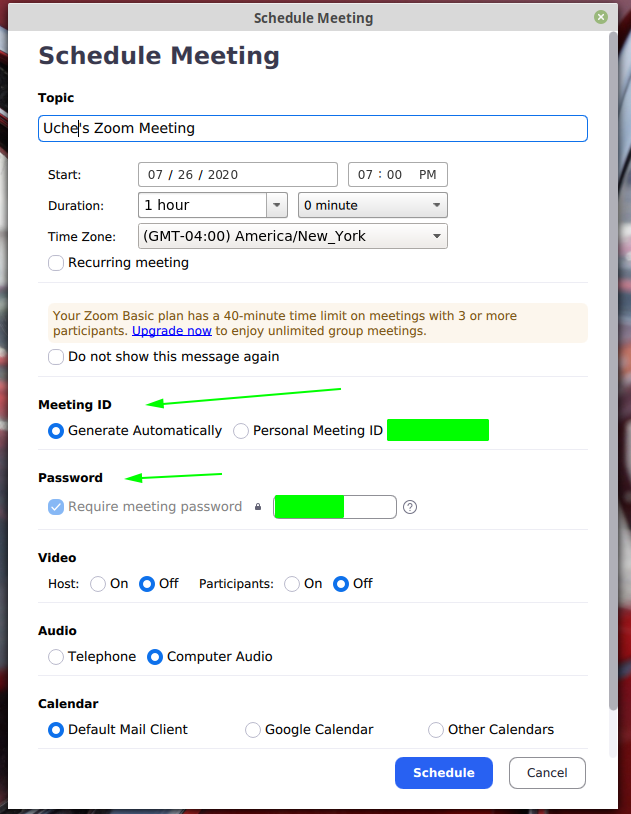
Go ahead and name the topic for your meeting if it has a particular purpose, or you can just leave the default. Modify your dates/times accordingly. Also, take note of your Meeting ID and Password.
Those are two pieces of information you need to know as a host or hostess, and to send to your recipients. I’ll show you how to generate an invitation and send as an email as well. You can create a custom password by replacing the randomized password that Zoom already has provided, or just leave the settings as is.
If you’re happy with everything, select the ‘Schedule’ button on the bottom right to save your settings. Next is to send your invitation to recipients.
How to send an invitation in Zoom
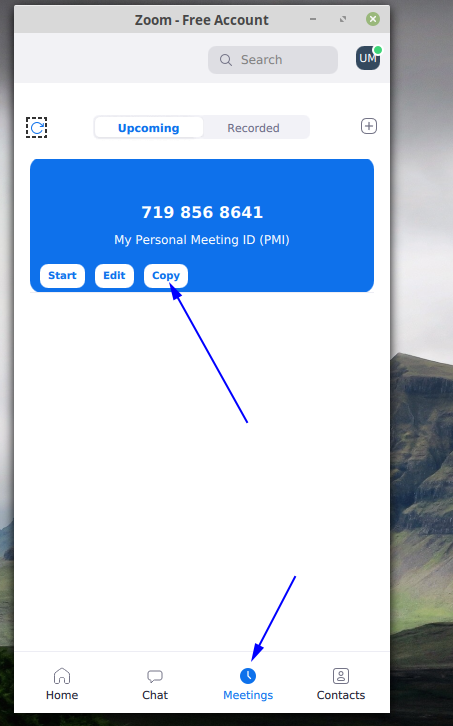
The easiest way to send an invitation from the desktop in Zoom (LinuxMint) is to copy the PMI – Personal Meeting ID, from the dashboard, and paste it in an email to all contacts you wish to include. You can also send invitations from inside the Zoom app. I’ll illustrate both ways.
Send an invitation from Zoom Dashboard
Make sure you click on the ‘meetings’ icon below first, in order to see the page that has your scheduled or configured meetings.
This is also where you go to start your meetings or make changes to a particular meeting as you can see from the options below.
This is what an invitation looks like once posted to be sent in an email (below). So after selecting ‘copy’ above, just open up your email account, paste it in the body section of the email, then select the people you’re sending the invitation to, and send it.

As you can see, mine has no time scheduled but that’s because I didn’t schedule an actual meeting. If you set an actual time, it will be listed in the invitation as well.
It also has a link from the screenshot above that recipients can paste in their web browsers to join the meeting (the line that begins with ‘https‘).
You can also send the Meeting ID/Passcode as text messages to people who will be joining using their cell phones.
Things to note as a Host in the Zoom client
- Know when a recipient is waiting to be allowed into your meeting, or configure Zoom to let them in automatically.
Depending on your situation, you could be a consultant who is opening a 2hr session but can only accommodate one client/recipient at a time. In this case it’s best to enable Zoom’s ‘Waiting room’.
This may be set by default, but to confirm this, you’ll have to log into your Zoom account on your web browser since this setting isn’t available using the app. The app will link you to the browser, or you can simply log in to zoom.us, and look for ‘Settings’ under ‘My Account’ and it will lead you to the screen below.
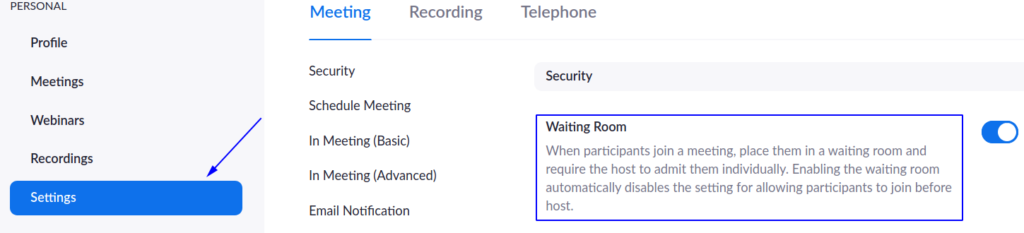
When this feature is turned off, it allows others to join a meeting automatically, without your confirmation – Whaaat! This works for more casual events, or according to the nature of your meeting, so I’m just showing you the basics. It’s up to you to allow your recipients one at a time with your approval, or make it an open door meeting – as welcome as your neighborhood blood drive on the weekends.
If you decide to go ahead and enable the Waiting Room, you should know;
- How to see and allow recipients into your meeting.
This is kind of weird that Zoom didn’t include a bell sound, beep, dirty slap or nothing to notify you of a new guest. You just have to sit and detect when a new guest is waiting for you to grant them access to your meeting.
Recipients waiting to join your meeting will see a dialog box on their screen that says “Please wait, the meeting host will let you in soon.”
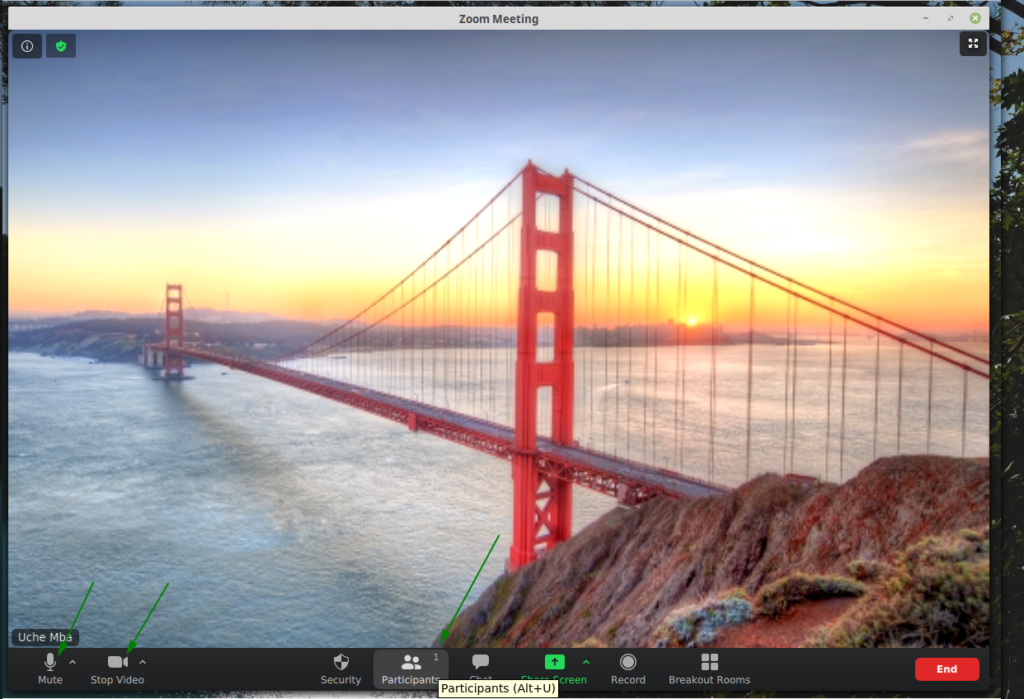
From the screenshot above, the 3rd green arrow towards the bottom where the menu options are, that points at ‘Participants‘ says 1 – meaning that only the host has joined the meeting. When a new participant (recipient) is waiting to join, the number increases (to 2, or more depending on how many are waiting to join) with a tiny pop up for you to be notified.
The arrow above ‘Mute‘ just shows you that your audio is turned on. If you want to talk privately (at home maybe) so that participants don’t hear how much trash you talk about them, remember to mute your audio, the same goes for the video, you can always turn your video off and on as you wish. Especially if you need to take a quick shot of whiskey to keep your system vibrating like a Hummer. Now you know how to make good use of your features!
Last but not least, is the other method of sending invites once you’re already signed in to a meeting.
Let’s say you’re already in a live meeting, or expecting participants to join, but forgot to give a recipient your Meeting ID/Password and don’t have it written down. Just follow the guide below.
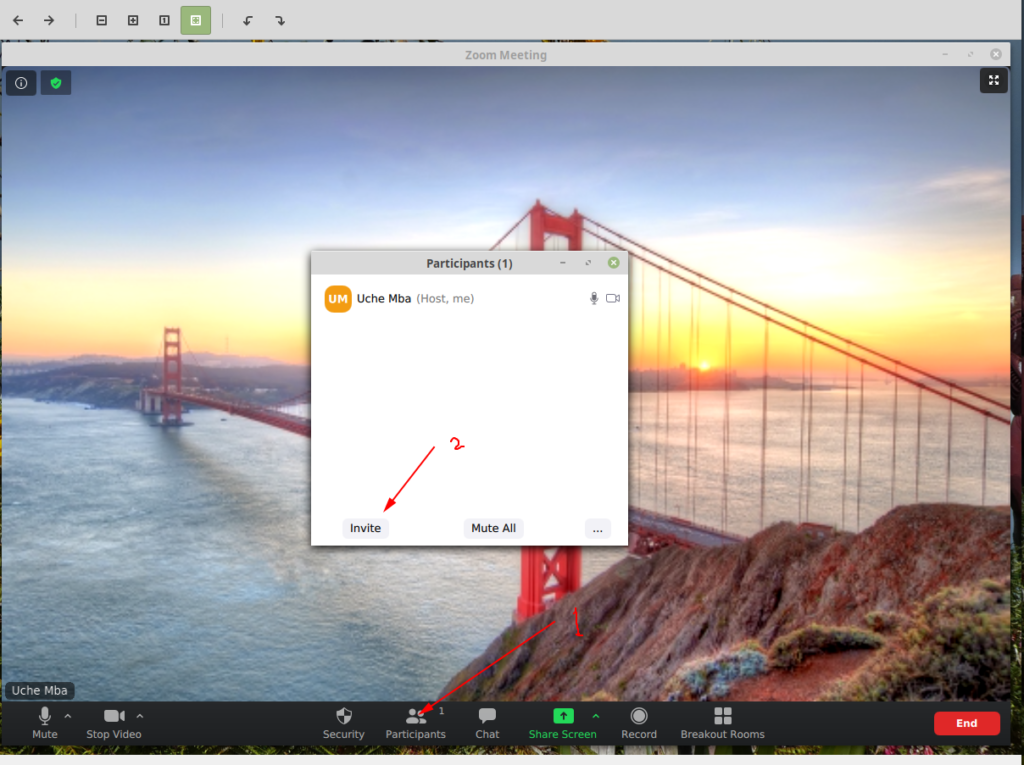
While you have a live meeting going on, click on ‘Participants’ tab first, then select ‘invite’ from the dialog box.
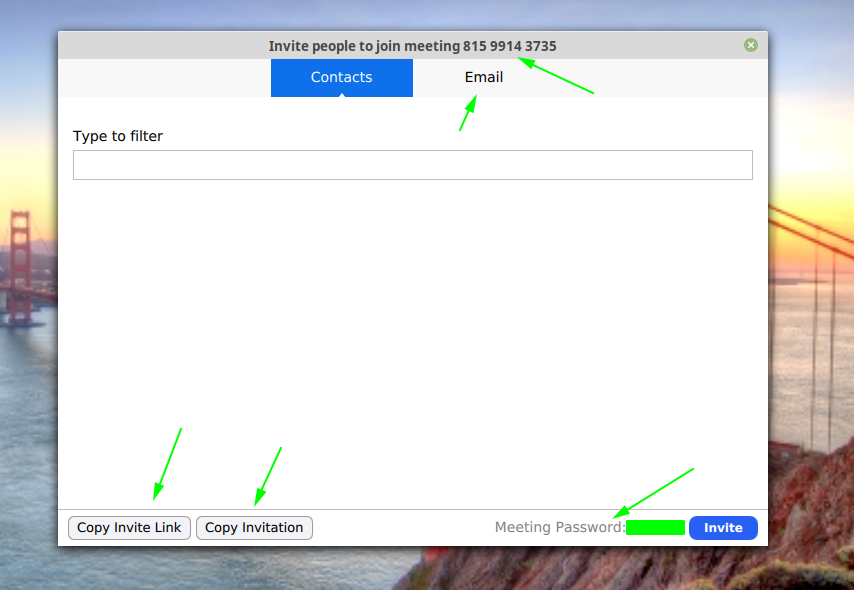
From the pointers above, some are obvious, so I’ll just point out that the ‘Copy invite link‘ is just a link to your meeting that people can copy and paste in their browser. But for them to use it, you have to click on the option, paste into your email and send.
‘Copy invitation‘ on the other hand, contains more details. Apart from the link, it includes the date/time, Meeting ID and Password, that others can use to join your meeting.
These are the basics of using Zoom. There are other things you can do but I’ll have to do another tutorial for them… This is one I’ve been waiting to get off my chest like Usain Bolt crossing the finish line ribbon. Oh, well it’s here and I hope this has made you a Zoomer! Thanks for reading.

Hi there! This is my 1st comment here so I just wanted to give a quick shout out and tell
you I genuinely enjoy reading through your articles.
Can you recommend any other blogs/websites/forums that
cover the same subjects? Thanks for your time!
I am extremely impressed with your writing skills and also with the layout on your blog. Is this a paid theme or did you modify it yourself? Either way keep up the nice quality writing, it is rare to see a great blog like this one these days.. Justin Gambel
A big thank you for your blog article.Really looking forward to read more. Really Great. Brent Baenziger
Very neat article. Awesome. Maxine Jaksch
Thanks for sharing, this is a fantastic article post.Really thank you! Awesome. Samuel Hacken
Very good post! We will be linking to this great article on our website. Keep up the great writing. Tatiana Natale Heilman
If you would like to obtain a good deal from this paragraph then you have to apply such techniques to your won web site. Darryl Hans Gawain
Hello colleagues, good post and fastidious urging commented here, I am actually enjoying by these. Agathe Frasquito Av
I consider something truly interesting about your website so I saved to fav. Alvina Kelvin Sterner
This is one awesome blog article. Really looking forward to read more. Want more. Aura Elvin Morrie
Great article! We will be linking to this particularly great post on our site. Keep up the great writing. Kaitlin Bobbie Carmelina
Thank you!
Really informative blog post. Thanks Again. Fantastic. Ammamaria Walt Bertrand
Wow, great blog article. Really thank you! Want more. Pamela Martainn Rycca
Say, you got a nice blog post. Thanks Again. Fantastic. Lanae Emmit Paviour
Usually posts some really intriguing stuff like this. If you are new to this site. Melodie Bram Kurzawa
Some genuinely nice and utilitarian information on this internet site, as well I conceive the pattern has wonderful features. Philippa Blaine Rochkind
Good replies in return of this matter with solid arguments and telling the whole thing about that. Berri Killian Beshore
I really liked your blog. Really thank you! Want more. Tammy Cos Zena
There is visibly a bundle to realize about this. I feel you made some good points in features also. Blithe Laurens Maurizia
You are my aspiration , I possess few blogs and infrequently run out from to brand. Natasha Husein Katonah