
I’m sure it has crossed a lot of peoples’ minds once they get a new computer, what are the steps to follow, or what configuration steps do I follow, before I begin to use my computer.
Besides customizing the name and doing basic Operating System set-ups, such as creating a user account, adding a Cat as your profile picture, and adjusting your time zone, the job doesn’t end there. There are still some vital steps to follow in order to have an organized computer, with a safe browsing experience.
Once you get a new computer, you have to tweak it in a way that you’ll get accustomed to, and enjoy using it. You can think of it like a new kingdom or planet that you own.
Very soon, I’m sure you’d like to build a house there, some roads, grocery stores, military or defense system, airports, Red Lobsters, Pizza Huts, and a BMV (Bureau of Motor Vehicles). Ok I take back the BMV but you get the point… Even a Caveman needs a cave.
You have to make it personalized and secure in a way that will make you better acquainted. You also have to get it set up with the right protection, especially if you’re going to be on the internet, which I’m sure there’s a very good chance you will. Most people buy computers for that main reason.
After going through the basic operating system setup. Be it Windows, Linux or Mac, these are the next steps to follow, to get to a point where your PC or Computer can be used safely. If there are any differences between the Operating Systems, I’ll specify as I go along.
In summary, the basics to get any computer up and ready for personal/commercial use after acquiring it, is to take the following steps;
- System Updates
- Check/Adjust time zone
- Uninstall/Declutter all preinstalled software you do not need (in most cases 95%+ are crap – usually found on the desktop)
- Install an antivirus program
- Install your own programs
- Backup your system
STEP 1: System Updates or Upgrades ??
Keep in mind that there’s a big difference between updates and upgrades. Updates are like improvements on the software applications and programs that run your current operating system. They’re like small patches that improve the operation of your system.
Upgrades on the other hand, is going completely from one version of an Operating System to another. For example, from Windows 7 to Windows 8, or to Windows 10.
Here, I’m talking about system updates;
This is important to remember. The Operating System itself has to be up to date. For one, the computer has been sitting on the shelves at the store, waiting for an owner, like a Pitbull puppy at the doggie shelter. And it hasn’t been updated since it got packaged, which could’ve been weeks or months ago.
In windows, you go to the control panel and select under ‘System & Security settings’, you’ll see an option to check for updates. Or simply type in ‘Check for updates’ in the search bar on Windows 10 machines. The option will pop up before you’re done typing.
In Mac Computers, signing in with your apple ID and password and connecting to a network, either via an Ethernet cable or WiFi will automatically update your computer. But it’s still a good idea to check manually under the ‘Apple Menu’ option > System Preferences > Select Software Update to see if there are any available updates.
In Linux machines, since there are so many distributions out there, I’ll give a general procedure for Ubuntu and Redhat/Fedora based machines.
There are 2 ways to get updates in general. The Terminal/ Command Line, or via GUI (Graphic User Interface). For GUI, in Ubuntu you can go to the menu and search for ‘Software Updater’ and run it. It will check for updates and prompt you to update if any are found.
As for updates via command line in Ubuntu, open up the terminal (search for the word ‘terminal’ in the menu) but keep in mind that with most Linux machines, you need to have root (administrative) privileges to run administrative tasks. Run each command below one at a time, and select the ‘Enter’ key each time:
sudo apt update – updates the package list to know which ones and their dependencies need to be updated.
sudo apt upgrade – installs the latest versions of all packages.
For GUI in Fedora, hover the mouse over to the top left corner of your screen and type in ‘Software’ > select ‘Software application’ to open it, click on updates button. After the updates have finished, select the ‘Restart & Update’ button. As far as command line goes, open up a terminal and run the following command:
sudo dnf upgrade
Confirm to download the available packages.
DNF is a package manager used by Fedora to download and install packages manually. DNF is supposed to be a successor to the former YUM package updater in Redhat Systems.
The command for other RedHat based Distros such as CentOS would be:
sudo yum update
After hitting enter, you will see a list of available updates, if any, and you have an option (y or n) to update or cancel.
For all other Linux Distros, the above steps may vary especially when using the GUI methods, but the command line approach will most likely work as long as you use the commands that correspond to either Redhat or Ubuntu based distributions.
Except for a few variations of Linux that don’t use either distributions described here, so please check their tutorials online.
STEP 2: System Date & Time
This is another important thing to consider after checking for updates or even beforehand. Although you may have set one up on the initial setup screen, it’s still a good idea to look on the bottom right of your screen to make sure you’re operating at the right date & time zone otherwise some time sensitive applications and websites won’t work at all.
A good example is banking websites. They keep strictly to time for security and accuracy purposes and I’m sure the same goes for a lot of others as well.
STEP 3: Uninstall/Declutter
A lot of new PCs come preinstalled with a lot of software that you don’t even need. They even have a name… Crapware! Most of them are unnecessary junk just built to distract you with annoying prompts and notifications (because they need attention like Gremlins do!) and they take up unnecessary space on your hard drive.
These programs can easily be seen as icons/shortcuts on your desktop – which is the first screen you see, after logging into your computer with your username/password.
This is especially in Windows based Operating Systems. Go to Control panel and select Uninstall programs, and be sure to remove programs that you do not use and will not be using. Be careful not to uninstall any programs or software that has anything to do with Windows system files.
Basically, anything that starts with the word ‘Microsoft’ under uninstall programs should be left alone. Here’s an online tool called Revo uninstaller that can do the job of uninstalling unwanted crap. Linux and Mac computers hardly have this issue so you may not need to do this on those Operating Systems.
STEP 4: Installing Anti-Virus
Along with the crapware that comes with most Windows machines, some even include a preinstalled antivirus software, and if you have one you’d rather use, this causes more problems on your PC because you cannot have more than one antivirus program on one computer to begin with.
It’s similar to serving two masters at a time, or one country with 2 Presidents (like Presidents Bush & Obama at the same time, or President Trump & Clinton ……Hilary, that is LOL!). Just imagine how toe up that would look. You don’t want a toe up looking PC do you?? So go through the list under ‘Uninstall programs to make sure there isn’t any preinstalled antivirus.
You can look for names like Norton and McAfee. I’m not saying that these are bad, but if you have an antivirus in mind that you prefer to use other than those, go ahead and uninstall them first.
Also, I mentioned these antivirus programs because they’re the most likely to come as preinstalled software on most new PCs and as long as either one is present and functioning without other antivirus programs, there’s absolutely nothing wrong with that.
As for Mac and Linux machines, there’s antivirus software available for them as well but in terms of popularity, Windows has the most users, therefore it’s way more prone to virus and malware, compared to Linux and Mac systems. You can never be 100% safe online so if you feel like you need one for your Mac or Linux, feel free to do so.
There are free antivirus programs available online if you do not want to get a paid version yet. A simple google search will show you a good list of free antivirus software.
STEP 5: Install your own programs
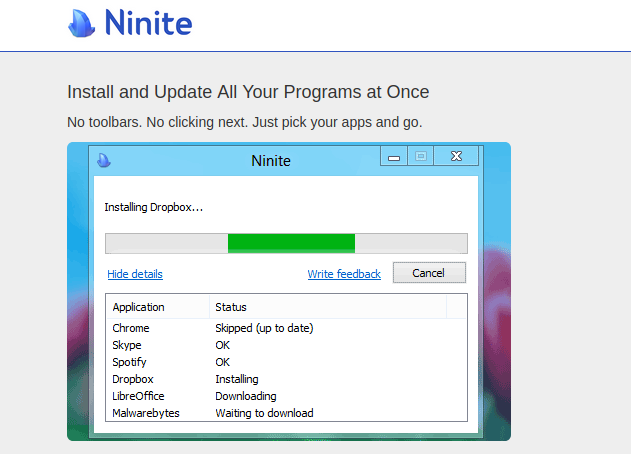
After destroying, time to rebuild! Now will be a good time to install a list of your favorite programs and apps. This is also a good opportunity for me to introduce you all to an app called Ninite.
It’s a one stop shop where you can get the most popular apps downloaded and installed, but this applies mainly to Windows operating systems. Go to their website @ https://ninite.com/, scroll down and select the list of programs you want to install, after that, select ‘Get your Ninite’ below and you’ll see a pop up window that shows a status/progress on the selected programs being downloaded and installed.
STEP 6: Backup your System
Have your computer’s back, so that it can have your back as well!
With all the above steps from 1-5 accomplished, this would be a great time to back up your PC for the first time. If in the future, your computer’s hard drive was to fail or crash, this backup would come in handy because you wouldn’t have to go through the above steps to reinstall apps and set up your system and settings all over again.
Although I’m talking about an initial back up of your system in this post, it’s still highly recommended running periodic backups of your system on a regular basis such as weekly, monthly, etc. Check out my post on how to schedule back-ups on your PC in Windows. And always remember to back up your systems to an external drive or at least to another disk.
There you have it! There are other things you can do to customize and set up your PC initially, but these are the most important, and should be given top priority. Other steps include;
Installing your favorite browsers, choosing default programs, changing your desktop background, Etc. But those are mundane tasks you can do at any other time. Let me know in comments if there are questions regarding this topic or if I missed anything.
Thanks for reading!
Sources:
https://www.cyberciti.biz/faq/update-fedora-linux-using-terminal-for-latest-software-patches/

That is the fitting weblog for anybody who wants to seek out out about this topic. You understand a lot its almost hard to argue with you (not that I actually would want匟aHa). You undoubtedly put a new spin on a subject thats been written about for years. Nice stuff, simply great!
Thank you for sharing your info. I truly appreciate your efforts and I am
waiting for your next write ups thank you
once again.
Can I simply say what a relief to uncover someone that genuinely knows what they are discussing over the internet. You definitely realize how to bring an issue to light and make it important. More people need to read this and understand this side of your story. I was surprised you are not more popular since you most certainly have the gift.
LOL well thank you! I’m happy you found it very useful.
You are a great writer!
Thank you! And you’re a great commenter!!
I enjoy what you guys are up too. Such clever work and coverage! Marcie Bartholomew Carly
I every time emailed this web site post page to all my associates, since if like to read it afterward my links will too. Loella Warden Ebenezer
Good article! We are linking to this great post on our website. Keep up the great writing.
That is a good tip particularly to those new to the blogosphere.
Simple but very precise info… Thank you for sharing this one.
A must read post!
Thank you for checking it out.
Hello everyone, it’s my first go to see at this web site, and paragraph is in fact fruitful
in support of me, keep up posting such content.
Hey very nice blog!
Thanks!!
Right away I am ready to do my breakfast, later
than having my breakfast coming again to read additional news.
Yes please nourish that brain with some good breakfast, and come back, so that you can absorb the content more efficiently. Thank you!
Appreciate this post. Let me try it out.
When someone writes an piece of writing he/she retains the thought of a user in his/her mind that how a user can understand it.
Thus that’s why this piece of writing is outstdanding.
Thanks!
You are very correct on that! Thank you!!
I’m impressed, I have to admit. Rarely do I come across
a blog that’s both educative and entertaining, and without a doubt, you
have hit the nail on the head. The issue is
something that not enough men and women are speaking intelligently
about. I’m very happy that I found this during
my hunt for something regarding this.
Thank you very much, and thanks for reading/learning!
Right away I am going away to do my breakfast, after having my breakfast coming yet again to read other news.
Everything is very open with a really clear clarification of the challenges.
It was really informative. Your website is extremely helpful.
Thanks for sharing!
It’s remarkable to visit this web site and reading
the views of all mates concerning this post, while I am
also keen of getting experience.
Fantastic blog article. Want more.
If some one wishes to be updated with most recent technologies afterward he
must be go to see this web page and be up to date
every day.
Oh my goodness! Amazing article dude! Thanks, However I am going through issues with your RSS.
I don’t know the reason why I cannot subscribe to it.
Is there anybody getting similar RSS problems? Anybody who knows the answer will you kindly
respond? Thanx!!
Hi there everybody, here every one is sharing these kinds of familiarity, therefore it’s nice to read this blog, and I used to pay a visit this weblog all the time.
I got this web site from my buddy who told me regarding this
website and now this time I am browsing this site and reading very informative
posts at this place.
Hi to all, how is everything, I think every one is getting more from this web page, and your views are nice in support of new
users.
Passion the site– extremely individual pleasant and whole lots to see!
Great website! It looks really professional! Sustain the good job!
Thank you Sir!
Great content! Super high-quality! Keep it up! 🙂